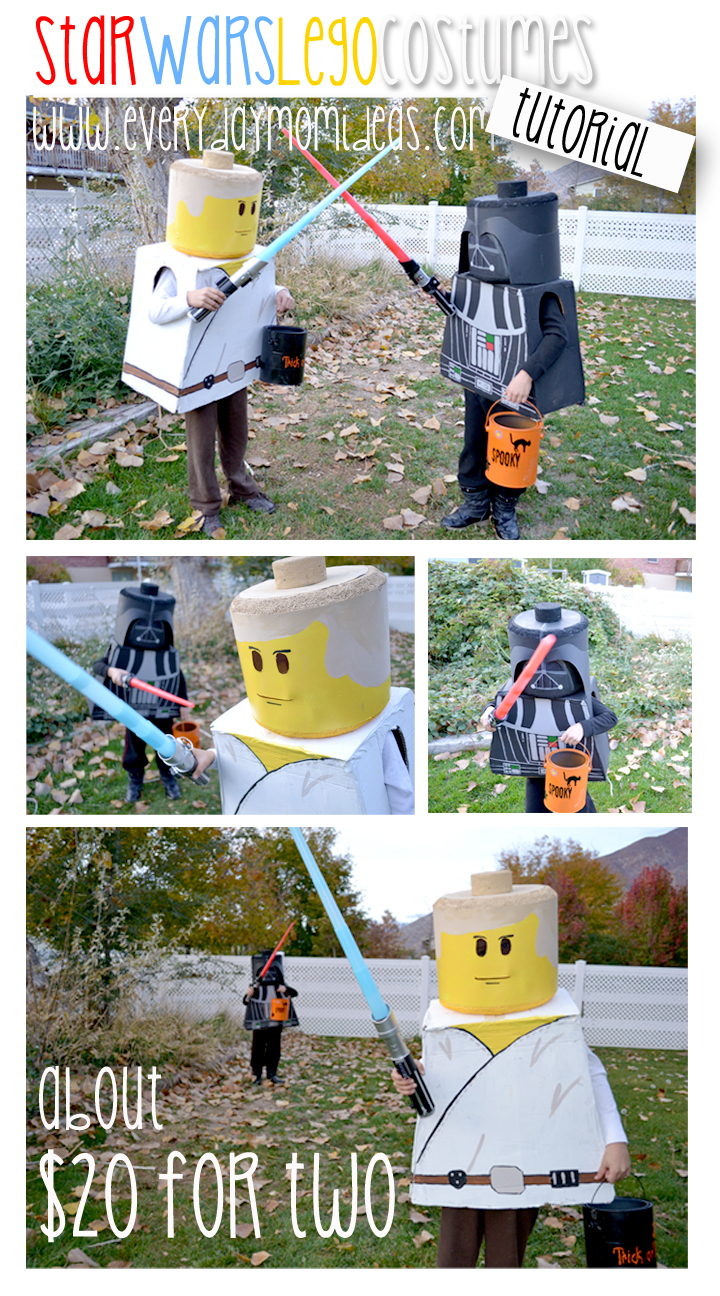
I don’t know about you but its all things Lego Star Wars with my seven and eight year old. And they have been begging me for moths to let them be Lego Skywalker and Lego Darth Vader for Halloween. And guess what… you can’t buy that costume anywhere, it doesn’t exist… in fact there wasn’t even a tutorial for how to make this costumes. So I was on my own. Thank goodness I am no stranger to cardboard, poster board and paint. Just call me the cardboard queen. These costumes took me about four hours to make and about twenty bucks all together. And they were a hit.
Everywhere we went random people wanted to take their pictures. They were like the rock stars of Halloween! They were even nominated for Best Costume at one of our local businesses.
A few months later we used the Lego Darth Vader costume again for my son’s Lego Star Wars birthday party. You can even fit grown ups in these bad boys. So these will last a while if you put them away carefully.
Need(to make both costumes):
1/4 yard of black Mesh
4 foam wreaths($2.00 at craft store)Make sure they fit your kids head.
2 foam cylinders (1.00 at craft store)
2 large cardboard boxes (free at grocery store)
2 white poster boards($0.50 each at dollar store)
2 black poster boards($0.50 each at dollar store)
packing tape
Craft Paint: yellow, white, brown, black, red, green,
Hot glue and glue gun
1. Shave the wreaths on the outer sides to make it more round like the lego head.
2. Measure your poster board for the face area. You are probably going to need to put two lengths together so it will be long enough to go around the foam wreaths. Before you hot glue the poster board around the wreaths you are going to want to draw and cut out the parts for the eyes and mouth. Try and put the eyes where your kids eyes are going to be and make them as big as you can without making it look terrible.
3.Generously hot glue the poster face to the foam wreaths.
4. Trace and cut out a circle to go on top of the head and you can just secure that down with hot glue as well. Then top it off with the small foam cylinder to complete the lego head shape.
5. Now its time for painting. Outline the hairline first with pencil. Generously paint on the yellow for the lego skin. You will probably need 2 to 3 coats to make it look nice and even.
6.Now its time to paint Luke Skywalker’s side swept shaggy blond hair.
7. For the finishing touches you either want to paint on the eyebrows and lip line or use black marker. Both work. Then use the mesh fabric to cover the eyes area. I hot glued several layers of the mesh fabric on the inside of the head so that it wasn’t so see through from the outside viewer. My son could see just fine looking out.
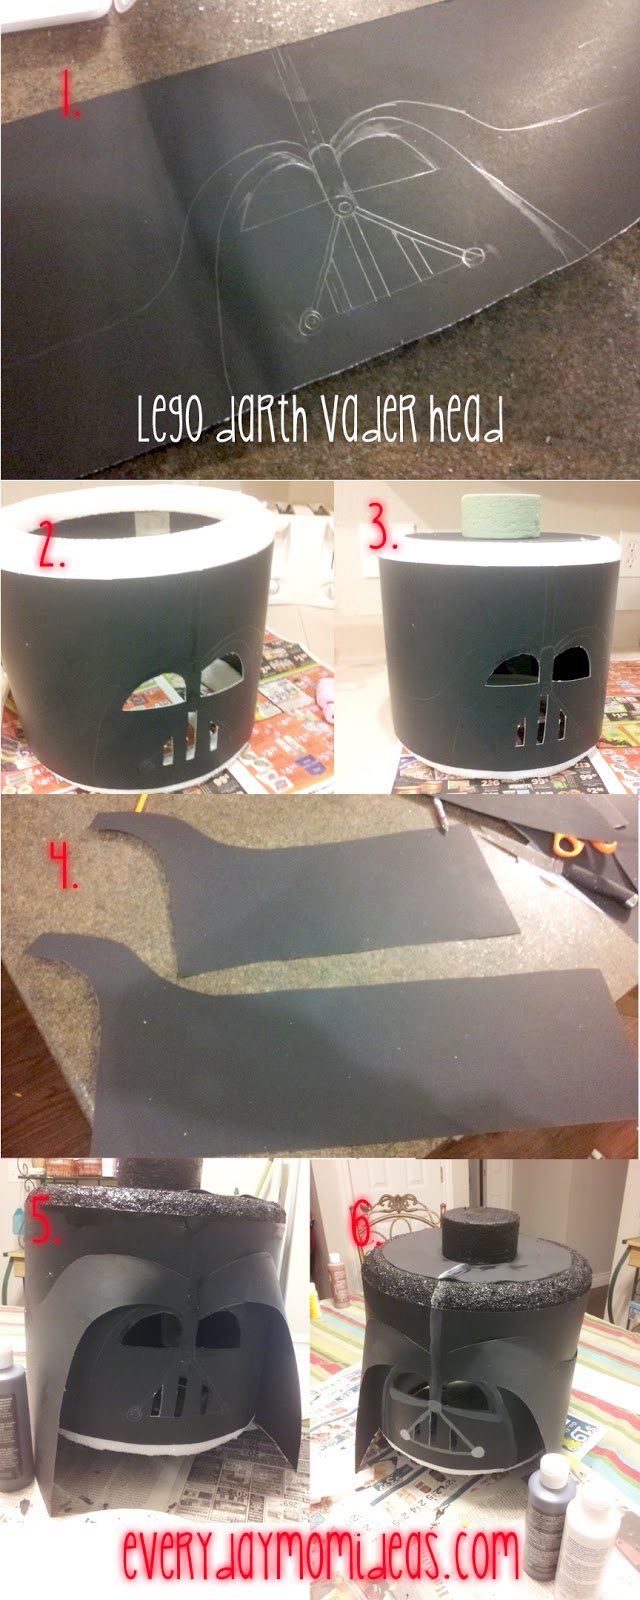
1. Darth Vader head is made very similarly. Cut out the length for the face area out of the poster board and sketch on lightly with pencil a simple Darth Vader mask design. I decided to go with this simple look but feel free to get more detailed if you want. And cut out the eyes and mouth parts.
2. Hot glue poster face strip around the shaved foam wreath pieces.
3. Trace and cut out a circle out of the black poster board to go on top of the head and you can just secure that down with hot glue . Then top it off with the small foam cylinder to complete the lego head shape.
4. Now this is about the only tricky part in the project. You’re going to want to double check things before you do any cutting out. For the helmet flaps you are going to tape together two lengths of poser board so that it will be long enough to go all the way around. Using the shape in the step 4 image as an example, measure and pencil out where you need to cut. Make sure you make the flap lengths extra long so they can overlap in the back. When you go to glue on the helmet flaps start with in the front with by the eyes and curve it around so the pieces pop out. Hot glue as you go. You may need an extra pair of hands for this part. Trim up the back with some scissors to make it nice and roundish.
5. The Darth Vader Head doesn’t need as much painting so just go ahead and paint all the pieces that aren’t black already.
6. For the details on the helmet just use different shades of dark grey to highlight of few things. I just kept it simple.
The Body:
1.The bodies for Darth Vader and Luke Skywalker are the same just measure your kid giving special detail to the shoulder lengths so that the box bodies aren’t too wide for you kids arms to rest at their sides and make sure the cutouts for the arms are long and oval for more movement. I made my box bodies too long and my boys couldn’t sit down in them lol! Thank goodness we only really needed them for trick or treating and they are really easy to slip on and off to get in and out of the car or for when they wanted to sit down. So fi you want your kid to be able to sit down in this make sure its not too long. After you have your measurements you can cut the shapes out. the top of the body is not as wide as the bottom. Use the first cutout as a template for the other matching side so that it matches up perfectly.
2. Secure the sides with packing tape.
3.To do the top you are going to need two extra pieces of cardboard and just cut out a circle for your kids head to go through.
4. Painting! Paint one white and one Black all over with multiple coats.
5. Details. You can use the photo below to give you some ideas on how you should do the details. I tried to use just simple shapes with mine.
And your done. Because we used craft paint, tape and hot glue it’s basically ready to go. The head just rests on the shoulders of the box body. If you are having too much trouble with the head sliding around you can just tape the head down or use Velcro pieces. The head sliding around wasn’t that much of a problem for our boys but you may want to figure out a way to secure it strait a bit more.
To finish off the look add a white long sleeved shirt and brown sweat pants for Luke and black, black, black for Darth. My son came up with the idea to wear his black rain boots with his costume. And then I just found some cheap light sabers on Amazon for five bucks. The light sabers also make a great double for a night light out there in the dark. I know this seems like a lot of steps but it really only took me four hours to make (without a tutorial) both of these in one night and a lot of the materials I already had myself. My kids helped a lot with making their costumes and they had a blast. It was one of the most memorable Halloweens.
I would love to see your versions so please send me a link and I will surely feature your costume in the next “What you’ve been up to post.”


